Showing posts with label diy. Show all posts

Sunday, 5 February 2017

How to repurpose loom bands into a DIY woven heart

I don't know about you, but we seem to have alot of loom bands hanging around the house.

I though I would share this creative way to reuse them to make a woven heart.

I created this woven heart using:
- round wood slice (I bought mine from our local wood recycling centre. You could contact a tree surgeon, or maybe use an offcut of wood)
- paper heart template
- small nails
- hammer
- loom bands, but you could use elastic bands too

First I created a heart template in paper and stuck it to the wood with blu tack. I then tapped the nails in around the shape of the template. Finally I looped the loom bands onto the nails. It's as simple as that.

My design is super-simple, so you could adapt the idea to make it more intricate. You could fill the centre of the heart with more nails and criss cross the loom bands. Or maybe go for a more elaborate shape. How about using a whole rainbow of loom band colours?

I am really pleased with the way my DIY project turned out. I'm planning on making some more to put on our allotment. I may try a star shape next or my initials. I'd love to hear your ideas...

If you'd like to see more creative projects, head over to my Pinterest...I'd love to connect with you over there!

I am linking up with Trash to Treasure over on www.coombemill.com

Thursday, 9 June 2016

How to make amazing windspinners with upcycled drinks cans

completed upcycled drinks can windspinners

I’m always looking for interesting decorations to put on our allotment.
I spotted some upcycled wind spinners made with drinks cans online and decided to have a go at making some. I’m really pleased with the results and wanted to share the making process in this tutorial.
They are really simple to make and once you’ve made a couple, you’ll get the hang of it.
I hope you enjoy making them too, I think they look great spinning away in the wind…

what you will need to make wind spinner

You will need…
2 clean aluminium drinks cans
10” of stiff wire (I’ve used PVC-coated garden)
Kitchen scissors
Bradawl (a nail & hammer work just as well)
Long nose pliers
Combination pliers (to cut the wire)
Tin opener
4-6 beads (plastic or wooden)
Masking tape
Marker pen

For my wind spinners I have used tall aluminium cans, the type you get beer or cider in. The taller cans make a larger spinner. You can use smaller soft drinks cans if you prefer.

preparing drinks cans to upcycle into wind spinners

Step 1:
Using a tin opener, cut the tops off the cans (ring pull end). Once the top has been taken off, rinse out thoroughly and leave to dry. Once dry, trim down the excess aluminium at the top of the cans.

prepping drinks cans to make wind spinners

Step 2:
Now you need to cut the cans to create 12 fairly equal ‘spokes’. One method is to wrap a piece of masking tape around the can and mark off equal sections with marker pen to guide you. Try to get the spokes as equal as possible, but don’t get too hung up on it. Once the spokes are joined together, the overall effect looks good even if you haven't got every single spoke exactly the same width...

marking off spokes for wind spinner

Step 3:
Once you are happy with the marking off of your 12 spokes, use the kitchen scissors to cut slits from the top edge to within 1/4" from the bottom.

cutting spokes on upcycled wind spinner

Step 4:
Next, open out each of the spokes outward and down. Tip: press your thumb against the bottom of each spoke before bending them out - it will help stop the metal from crimping.

creating wind spinner spokes

Step 5:
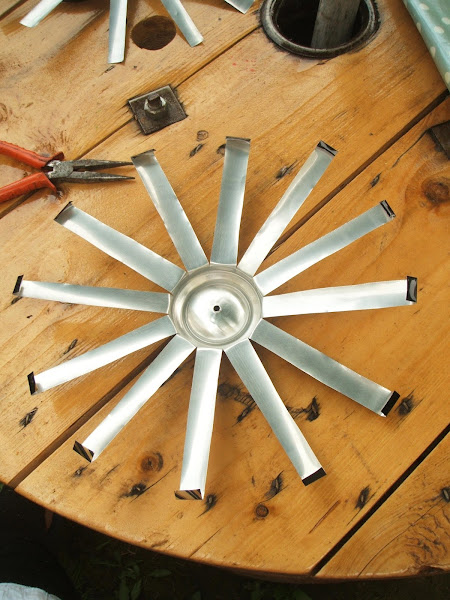
Once you have fanned out the spokes, you should have something that looks like this. Repeat with the other can…

fanned out spokes on windspinner

Step 6:
Using the bradawl (or hammer and nail) punch a hole in the bottom of both cans.

fanned out spokes of drinks can wind spinners

Step 7:
Use the long nose pliers to fold over the end of each spoke (about 1/4" is enough). Repeat process on both cans.

pliers bend ends of wind spinner

photos showing process of creating wind spinner

Step 8:
Now you are ready to construct your windspinner by joining the spokes together. Overlap the end of a spoke from one can with the end of a spoke from the second can. Slide the corners together and hold firmly with the fingers of one hand, use the long nose pliers to bend the corner over. Use the pliers to crimp the corner tightly together to secure the spokes.

step by step tutorial showing how to make drinks can windspinner

Step 9:
Move onto the next spoke and repeat the above process. Keep linking the spokes together until they are all joined up. Your wind spinner should now look like this…

completed upcycled soda can wind spinner

Step 10:
Using the long nose pliers bend the end of the wire to make a small loop. Thread 2-3 beads onto the wire and then thread the wire through the holes, top and bottom, in the cans. The wire should now run through the centre of your wind spinner. Thread the remaining 2-3 beads onto the wire.

attaching beads to upcycled windspinner

tutorial making drinks can windspinner

Your wind spinner is now ready to hang either in your garden or on an allotment plot. It is possible to stack 2-3 spinners on top of each other. Just join the wires together or thread a longer piece of wire through the centre. Just remember to thread beads between each spinner or they wont rotate in the wind.

tutorial showing how to make upcycled drinks can windspinner

They really come alive when they are spinning in the wind. So I'm going to try and get a video of one of my spinners 'in action' on our allotment plot...

There you go, a great way to upcycle empty drinks cans…enjoy!

Feel free to pin the image below to your Pinterest, but please link back to this post, thank you!

I'm linking up with...

Trash2Treasure over on www.coombemill.com

HomeEtc over on www.thetwinklediaries.co.uk and mummyofboygirltwins.com

Making Home over on www.mrscraftyb.co.uk

Thursday, 19 May 2016

DIY project to make you fall in love with wooden cable reels

One thing missing from our garden is a decent table for outdoor dining. Now the weather is warming up, we wanted to source a piece of furniture that would be robust enough to live outside all year round.

Somerset Wood Recycling is one of our favourite places to mooch around on a Saturday morning. I blogged last year about the wood we bought to make Magoo's upcycled garden swing. They have so many pieces of wood in all shapes and sizes at SWR. I don't have any carpentry skills, but I love looking at the wide range of patinas and grains on display.

However, Mr M does see himself as something of a woodsman. This year he bought himself an axe which we used to break up our allotment shed back in February. I think he has visions of living in the woods, carving his own bow and arrows. At Christmas I also bought him some wood whittling tools and a 'how-to whittle' book. Working with wood seems to be his thing, so he doesn't need much persuading if I suggest visiting Somerset Wood Recycling.

Last time we visited, a large pile of wooden cable reels stacked up outside caught our eye. We have considered making a table from one of these reels for quite a while now.

We decided a few weeks ago to buy the largest reel we could fit in the car. Once it was home, Mr M set about sanding it down. It was always going to be a rustic table so we weren't aiming for a perfect finish. Even so, the reel still had some very rough edges, we couldn't use it as a table until it was smoothed down.

After the sanding, Magoo wanted to pitch in and get involved with the project. Magoo and her dad set about painting varnish onto the wood. This table will sit outside all year, so we want to try and preserve it as much as possible.

And that's pretty much all we did to create a strong, wooden dining table. Over the past few weeks we have used it for meals, playing board games and outdoor colouring sessions. It really adds an extra dimension to our garden and it was a bargain at only £20.

One of the best things about the wooden cable reel is there is a pre-existing hole right down the middle. Perfect for putting your sun umbrella in and no drilling required.

The next stage is to install a patio in the corner of the garden where the upcycled table will sit. We managed to get hold of some amazing slabs from FreelyWheely and they didn't cost a penny.

All in all it has turned out to be a thrifty DIY project. Since getting hold of our reel I have looked online to see how other people have upcycled theirs. There are so many fantastic example out there. We quite like the rustic look of the plain wood, but there is plenty of scope to get more creative with the cable reels. Some ideas include adding mosaic to the top, whitewashing the wood and wrapping rope around the central column.

I love these cable reels so much I'm going to go back and buy a smaller one for the allotment. It will be perfect for putting our cups of tea and sandwiches on...

I'm linking up with these lovely blogs:

"Trash 2 Treasure" over on www.coombemill.com

"Making Home" over on www.mrscraftyb.co.uk

"Let Kids Be Kids" over on letkidsbekids.co.uk

"Country Kids" over on www.coombemill.com

"Sweet Inspiration" over on repurposingjunkie.com

"Home Etc" over on www.thetwinklediaries.co.uk

Monday, 20 February 2012

My first magazine tutorial!

I've just received a copy of the latest issue of the Handmade Living magazine and if I turn to page 78 I can see my first ever published tutorial!

It's for a Pouch foldaway market tote. This handy tote folds away into it's own pocket. Perfect for storing in your purse for spontaneous shopping sprees!

It's lovely to see it in print and I'm really pleased because they have asked me to design another item to be published as a tutorial later on in the year...

Unfortunately the pattern for the market tote was left out at publication stage. The editor of Handmade Living has added it to the Errata section of their blog. I have also included it here too.

LinkWithin

Related Posts with Thumbnails