Monday 20 June 2016

A year on the allotment: June 2016

I never cease to be amazed at the growth spurt our plants put on in June. The end of May and early June were really warm and the plot looked parched. Then the weather changed and we've had buckets of rain over the past ten days or so. It's not great for picnics, trips to the beach or festival goers - but it's great for the allotment.

child holds a rip allotment strawberry

One crop in particular loves the wet British weather - the humble spud. The photo below shows Magoo watering the new bed on the 3rd June. You can just see the potato leaves poking out of the soil.

child helps to water the crops on the allotment

Fast forward to the 18th June, just fifteen days later, and you can hardly see Magoo as she weeds the area around the same potato bed. The rate of growth is amazing. We should be able to start harvesting our first spuds soon.

child helps to weed the allotment plot

We've already started to eat our first strawberries - they are delicious. Sadly the slugs and snails have munched their fair share of them. The wet weather brings the slimy molluscs out in force. We did spot a large frog in the strawberry bed. Apart from making us jump when he jumped, I'm hoping our resident frog is making a dent in the slug population...

strawberries ripening in a raised bed

We've also planted out some sprouts. It's the first time we've grown them, so I'm hoping we will be sitting down to Christmas lunch with homegrown sprouts. It's hard to imagine these fairly small seedlings will grow into sturdy sprout trees. If the slugs don't get them first. We don't use slug pellets, so we aim to plant out more than we need, then we can cope with some losses.

brussel sprout seedlings on the allotment

Magoo has her own raised bed and she gets to choose which crops go in there. This year she wanted to grow peas and broad beans. The peas are doing well and we spotted the first pods at the weekend. The broad beans are getting attacked with black fly as per usual. My Mum has sprayed them with a soap solution, so hopefully they will perk up soon.

peas growing up sticks on the allotment

We have a section of our allotment dedicated to flowers. Many of them are native wildflowers and the bees love them. Apart from brightening up the plot, it's important to attract pollinators. A neighbouring plot holder has two bee hives, so there's always plenty of them making the most of our flowers.

native wildflowers growing on our allotment

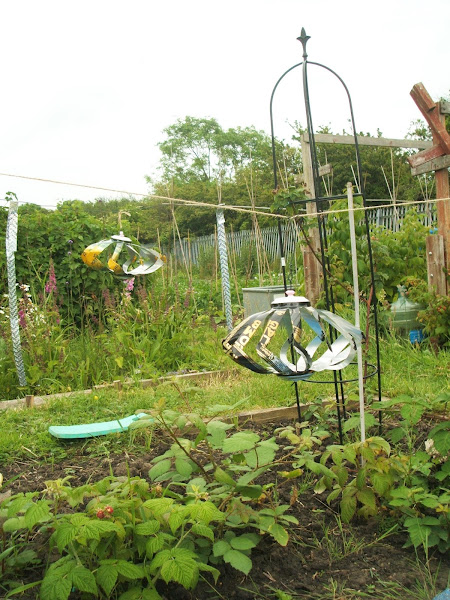
I've installed these windspinners made with recycled drinks cans by the raspberries and tayberries. I'm hoping they will deter the birds away from the soft fruit when they start to get ripe. If you'd like to make your own windspinners, head over to my tutorial. I'm planning on making more because they look great spinning away in the wind.

windspinners made with recycled cans on our allotment

Magoo did a sterling job helping to clear our ever expanding weed collection at the weekend. I find that the promise of fig rolls and a few jelly sweets help to coax Magoo into assisting Mum and Dad with the weeding. I think her limit is about twenty to thirty minutes of working away with her trowel, which isn't bad for a six year old. Plus we found these pretty blue flowers amongst the weeds. As Eeyore quite rightly says "Weeds are flowers too, once you get to know them."

small blue fower found on our allotment

This week I'm linking up with these lovely blogs...

"Country Kids" over on www.coombemill.com

"How Does Your Garden Grow" over on fableandfolk.com

"Point + Shoot" over on youbabymemummy.com and www.snowingindoors.com

"Making Home" over on www.mrscraftyb.co.uk

"Whatever the Weather" over on monkeyandmouse.co.uk

Thursday 16 June 2016

How to become a Dementia Friend

As part of my Shared Lives role I support a lady who lives with dementia. I was asked to go along to a Dementia Friends Information Session yesterday. I enjoyed the session and wanted to blog about the knowledge I'd gained and to help promote the 'Dementia Friends' initiative via this post and social media using the hashtag #dementiafriends

The hour long information session, in partnership with Alzheimer's Society, hopes to help make the county I live in a Dementia Friendly Community. My local authority is keen to create a large team of 'Dementia Friends' within the council and key public services.

At the end of the session I pledged to become a Dementia Friend. So what does this involve?

"A Dementia Friend learns a little bit more about what it's like to live with dementia and then turns that understanding into action - anyone of any age can be a Dementia Friend. Whether you attend a face-to-face Dementia Friends Information Session or watch our online video, Dementia Friends is about learning more about dementia and the small ways you can help. From telling friends about Dementia Friends to visiting someone you know living with dementia, every action counts."

We started the session talking about words we associate with dementia. Nearly all of them were negative. I think for most people, the thought of yourself or a loved one being diagnosed with dementia is frightening. But living with dementia doesn't have to be a completely negative experience.

Over the hour long session we talked about the five main things we needed to take away from the information session:
- Dementia is not a natural part of ageing
- Dementia is caused by diseases of the brain
- It's not just about losing your memory
- It's possible to live well with dementia
- There's more to a person than the dementia

The Alzheimer’s Society would like us to move away from the idea of someone 'suffering' from dementia and think of it as 'living with' the condition. With the right support and initiatives like Dementia Friends, some of the myths surrounding dementia can hopefully be dispelled.

We talked about the five points listed above in more detail, and in a relatively short time, I learnt a great deal. One of my favourite parts was the analogy of dementia and a set of Christmas fairy lights to explain simply how dementia affects everyone differently. To read a full explanation of this analogy you can follow this link. I found the 'fairy light' analogy really helped to clarify the concept of dementia in my mind.

Once we'd completed the information session, we were asked to turn our understanding into action...

Some of the ways Dementia Friends suggest you can do this are:
- Getting in touch and staying in touch with someone I know living with dementia
- Volunteering for an organisation that helps people with dementia
- Campaigning for change, eg by signing up to Alzheimer’s Society’s campaigns to improve the lives of people with dementia
- Wearing Dementia Friends badge and telling 5 friends about the Dementia Friends initiative
- Carrying out a personal action eg Be more patient when out in my community

The Alzheimer’s Society’s Dementia Friends programme is their biggest ever initiative to change people’s perceptions of dementia. Please visit the Dementia Friends website and take a few minutes to watch the video or attend an information session in your local area. And then hopefully you will pledge to become a Dementia Friend and help to support people in your community.

The paper doll images used in this blog post were made by my daughter and I over the weekend. Creating brightly coloured chains of people holding hands is one of her favourite things to do. It would be lovely if community focused initiatives like Dementia Friends really took off. I hope so.

In early May I wrote a blog posts called It's cool to be kind: why we should value carers. In this post I mention one of my favourite quotes: “no act of kindness, no matter how small, is ever wasted”. I think that's so true. We've all been in situations where someone's kindness, either from a stranger or someone we know, has changed our day, week or even our life. So please, if possible, pledge to become a Dementia Friend today...

This week I'm linking up with these lovely blogs...

"Share the Joy" over on thejoychaser.com and You Are a Daisy

"The List" over on youbabymemummy.com and www.mrandmrstplusthree.com

"Blogger Club UK" over on www.cuddlefairy.com, www.myrandommusings.co.uk and mudpiefridays.com

"Happy Days Linky" over on www.whatkatysaid.com and www.quitefranklyshesaid.com

Thursday 9 June 2016

How to make amazing windspinners with upcycled drinks cans

completed upcycled drinks can windspinners

I’m always looking for interesting decorations to put on our allotment.
I spotted some upcycled wind spinners made with drinks cans online and decided to have a go at making some. I’m really pleased with the results and wanted to share the making process in this tutorial.
They are really simple to make and once you’ve made a couple, you’ll get the hang of it.
I hope you enjoy making them too, I think they look great spinning away in the wind…

what you will need to make wind spinner

You will need…
2 clean aluminium drinks cans
10” of stiff wire (I’ve used PVC-coated garden)
Kitchen scissors
Bradawl (a nail & hammer work just as well)
Long nose pliers
Combination pliers (to cut the wire)
Tin opener
4-6 beads (plastic or wooden)
Masking tape
Marker pen

For my wind spinners I have used tall aluminium cans, the type you get beer or cider in. The taller cans make a larger spinner. You can use smaller soft drinks cans if you prefer.

preparing drinks cans to upcycle into wind spinners

Step 1:
Using a tin opener, cut the tops off the cans (ring pull end). Once the top has been taken off, rinse out thoroughly and leave to dry. Once dry, trim down the excess aluminium at the top of the cans.

prepping drinks cans to make wind spinners

Step 2:
Now you need to cut the cans to create 12 fairly equal ‘spokes’. One method is to wrap a piece of masking tape around the can and mark off equal sections with marker pen to guide you. Try to get the spokes as equal as possible, but don’t get too hung up on it. Once the spokes are joined together, the overall effect looks good even if you haven't got every single spoke exactly the same width...

marking off spokes for wind spinner

Step 3:
Once you are happy with the marking off of your 12 spokes, use the kitchen scissors to cut slits from the top edge to within 1/4" from the bottom.

cutting spokes on upcycled wind spinner

Step 4:
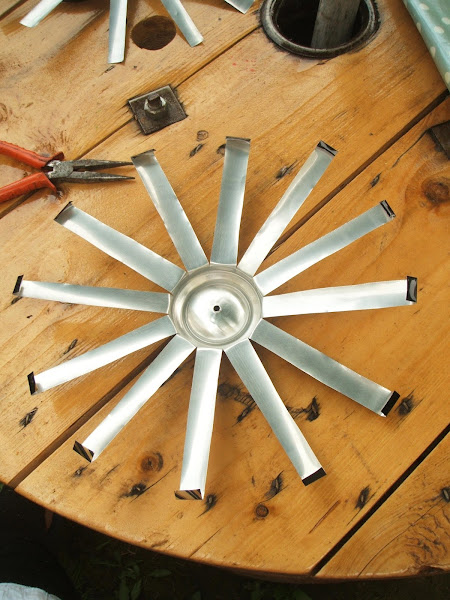
Next, open out each of the spokes outward and down. Tip: press your thumb against the bottom of each spoke before bending them out - it will help stop the metal from crimping.

creating wind spinner spokes

Step 5:
Once you have fanned out the spokes, you should have something that looks like this. Repeat with the other can…

fanned out spokes on windspinner

Step 6:
Using the bradawl (or hammer and nail) punch a hole in the bottom of both cans.

fanned out spokes of drinks can wind spinners

Step 7:
Use the long nose pliers to fold over the end of each spoke (about 1/4" is enough). Repeat process on both cans.

pliers bend ends of wind spinner

photos showing process of creating wind spinner

Step 8:
Now you are ready to construct your windspinner by joining the spokes together. Overlap the end of a spoke from one can with the end of a spoke from the second can. Slide the corners together and hold firmly with the fingers of one hand, use the long nose pliers to bend the corner over. Use the pliers to crimp the corner tightly together to secure the spokes.

step by step tutorial showing how to make drinks can windspinner

Step 9:
Move onto the next spoke and repeat the above process. Keep linking the spokes together until they are all joined up. Your wind spinner should now look like this…

completed upcycled soda can wind spinner

Step 10:
Using the long nose pliers bend the end of the wire to make a small loop. Thread 2-3 beads onto the wire and then thread the wire through the holes, top and bottom, in the cans. The wire should now run through the centre of your wind spinner. Thread the remaining 2-3 beads onto the wire.

attaching beads to upcycled windspinner

tutorial making drinks can windspinner

Your wind spinner is now ready to hang either in your garden or on an allotment plot. It is possible to stack 2-3 spinners on top of each other. Just join the wires together or thread a longer piece of wire through the centre. Just remember to thread beads between each spinner or they wont rotate in the wind.

tutorial showing how to make upcycled drinks can windspinner

They really come alive when they are spinning in the wind. So I'm going to try and get a video of one of my spinners 'in action' on our allotment plot...

There you go, a great way to upcycle empty drinks cans…enjoy!

Feel free to pin the image below to your Pinterest, but please link back to this post, thank you!

I'm linking up with...

Trash2Treasure over on www.coombemill.com

HomeEtc over on www.thetwinklediaries.co.uk and mummyofboygirltwins.com

Making Home over on www.mrscraftyb.co.uk

Monday 6 June 2016

Crafting is my Therapy #5 + colouring book giveaway

Welcome to the fifth “Crafting is my Therapy” blog link-up.

I hope you’ve had a wonderful month or making and creating.

This month we are holding another giveaway.
Up for grabs are two colouring books from Phoenix Yard Books. The prize includes two of their newest titles. "The One and Only Mandala Postcard Colouring Book" which takes all the intricate designs from their mandala range and puts them together in an accessibly sized book. "The One and Only Elephant Parade Postcard Colouring Book" is a books of designs taken from Elephant Parade, a social enterprise who run the world’s largest art exhibition of decorated elephant statues. This publication takes the designs painted on the elephants in the parade and brings them together into a beautiful collection of postcards for you to colour.
To be in with a chance to win these lovely colouring books, simply link up with a craft related blog post below...

Looking back over the pieces I have created in May...
...I wanted to have a break from sewing words and just play around with stitches. Sometimes it's nice just to sit down with fabric, thread and no real plan. I created a spiral in chain stitch and embellished a piece of one of my favourite vintage fabrics with embroidery stitches. I’m hoping to add more stitches to the spiral over the coming month...

In May we had a lovely selection of crafts added to our link-up. It was nice to see a few new craft bloggers linking up, we love seeing everything you’ve created. I enjoyed reading all the lovely posts and it was great to see Amy Loves to Sew creating finger puppets for her baby daughter using craft supplies she had won in our April giveaway.

In May we held another giveaway. There were 8 posts (not including the hosts) added to our link-up in May. Using the random number generator, I can tell you that the winner is…Simply Blossoms! A bundle of crafty goodies will be heading her way shortly.

If you love all things handmade then you might like to go along to Kirstie Allsopp's 'The Handmade Fair'. It will be held on The Green at Hampton Court Palace on the 16th – 18th of September 2016. Mrs Crafty B is offering a special discount code for 'Full Experience' tickets, head over to her blog to find out more...

Have you created anything crafty this month? If you sew, knit, crochet, paint, work with ceramics…please join in and share your blog posts.
The focus of this linky is crafting for pleasure, basically taking some ‘me-time’ to unwind in our busy lives. It doesn’t have to be a finished project, we love seeing work in progress, planning posts or tutorials too.

Grab the Crafting is my Therapy badge:

Me You and Magoo

I co-host Crafting is my Therapy with Jennifer Jain. She writes the popular craft blog Jennifers Little World. Jennifer hosts our Pinterest group board. Would you like your blog posts to be seen by over 700K followers? Craft Bloggers linking to #craftingismytherapy are welcome to join our board. It's a great way for your posts to reach a wider audience...

Giveaway Entry Rules:
– One winner will receive the two colouring books described above.
– The winner will be chosen at random from eligible entries to the linky this month.
– In order for an entry to be eligible it must be a relevant post, it must mention the "Crafting is my Therapy" linky either by text or using the badge, and it must link back to one of the linky hosts. The linky will remain open until Thursday 30th June 2016.
– If the winner does not respond within 28 days we will redraw and reallocate the prize. There is no cash alternative. Invalid entries will be discounted.

The “Crafting is my Therapy” linky will open today, 6th June, and stay open for the whole month – giving you plenty of time to get involved.

– You can link up with maximum of three posts per month, old or new.
– Grab the linky badge or link back to our blogs on your post.
– Please share the love and comment on other people’s posts.
– If you could share your post and the linky (using the hashtag #craftingismytherapy) on any social media channels that would be great. This will help us to grow the community. We will retweet all your posts via Twitter if you mention us (@pouchvintage/@JenniferJain )
– And finally, if you would like to follow me on Twitter, Pinterest and Instagram, you’re more than welcome! Jennifer Jain’s links are here too: Twitter, Pinterest and Facebook.

Wednesday 1 June 2016

Crafting in May: chain stitch spirals and french knots

It's time for my latest post looking at the craft projects I've been working on over the past month. As part of the "Crafting is my Therapy" project, I'm determined to make more time in my life for crafting and creativity. In April I created my 'it's cool to be kind' hoop. I was inspired by the work carers do and it's a subject I feel very strongly about. In May I wanted to have a break from sewing words and just play around with stitches. Sometimes it's nice just to sit down with fabric, thread and no real plan.

I have heaps of vintage fabric scraps and this one featuring retro circles is a favourite of mine. I thought it would be nice to embellish a small section with some embroidery stitches.

Alongside chain stitch and backstitch I thought I'd give French Knots a try. I have never sewn them before and spotted this "What's Knot To Love" tutorial over on the Ambrosia Stitches blog. You should also check out her "A Project that will Make You Love French Knots" post because it really will have you itching to try them out.

Back in March I learnt to sew chain stitch. I really fell in love with creating the tiny chains in thread. I had an idea in my head to create a spiral in chain stitch. Not sure why, I just liked the idea of sitting down and sewing a spiral in one stitch.

Whilst I enjoyed the steady rhythm of sewing chain stitch, I found the thread became quite twisted and 'splitty' (technical term!). I'm not sure if it's the fabric I'm using (calico) or the floss (Anchor Thread)...but the stitches were a bit hit and miss at times. I think the overall effect looks good, but I'm going to look into getting some different fabrics for embroidery. I'd love to hear your fabric recommendations and if their is a particular brand of thread you love. Any tips gratefully received...

Here are some more French Knots sewn by me this month. The purple and lilac knots are my very first attempts after reading Ambrosia Stitches post. I think I'm getting them right. It's the sort of stitch that makes you feel like you could do with an extra pair of hands. But you soon get into the rhythm of holding the thread taut and winding with the other hand.

Playing around with stitches has reinvigorated my interest in embroidery. Once I get back into stitching, I want to learn more. Next on my list is satin stitch. I've seen lots of tutorials online. Some people recommend filling the shape with running stitch before placing satin stitch over the top. This gives a more 3-D effect and probably looks amazing. But would I have the patience to do this? Other tutorials don't mention the running stitch stage and suggest edging the satin stitch with back stitch to give a neater outline. Some don't even think you need to add the outline stitching. I think I need to give a few methods a go and see what works for me. Again, any tips from experienced satin-stitchers would be most welcome...

The next "Crafting is my Therapy" blog link-up will open on 6th June. We'd love to see your makes, all crafts welcome...

This week I'm linking up with these lovely blogs...

"Share With Me" over on mummyfever.co.uk

"Blogger Club UK" over on www.cuddlefairy.com and www.myrandommusings.co.uk

LinkWithin

Related Posts with Thumbnails