I’m always looking for interesting decorations to put on our allotment.
I spotted some upcycled wind spinners made with drinks cans online and decided to have a go at making some. I’m really pleased with the results and wanted to share the making process in this tutorial.
They are really simple to make and once you’ve made a couple, you’ll get the hang of it.
I hope you enjoy making them too, I think they look great spinning away in the wind…
You will need…
2 clean aluminium drinks cans
10” of stiff wire (I’ve used PVC-coated garden)
Kitchen scissors
Bradawl (a nail & hammer work just as well)
Long nose pliers
Combination pliers (to cut the wire)
Tin opener
4-6 beads (plastic or wooden)
Masking tape
Marker pen
For my wind spinners I have used tall aluminium cans, the type you get beer or cider in. The taller cans make a larger spinner. You can use smaller soft drinks cans if you prefer.
Step 1:
Using a tin opener, cut the tops off the cans (ring pull end). Once the top has been taken off, rinse out thoroughly and leave to dry. Once dry, trim down the excess aluminium at the top of the cans.
Step 2:
Now you need to cut the cans to create 12 fairly equal ‘spokes’. One method is to wrap a piece of masking tape around the can and mark off equal sections with marker pen to guide you. Try to get the spokes as equal as possible, but don’t get too hung up on it. Once the spokes are joined together, the overall effect looks good even if you haven't got every single spoke exactly the same width...
Step 3:
Once you are happy with the marking off of your 12 spokes, use the kitchen scissors to cut slits from the top edge to within 1/4" from the bottom.
Step 4:
Next, open out each of the spokes outward and down.
Tip: press your thumb against the bottom of each spoke before bending them out - it will help stop the metal from crimping.
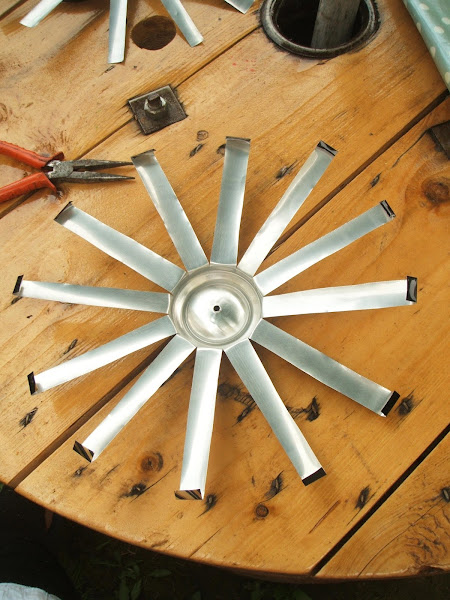
Step 5:
Once you have fanned out the spokes, you should have something that looks like this. Repeat with the other can…
Step 6:
Using the bradawl (or hammer and nail) punch a hole in the bottom of both cans.
Step 7:
Use the long nose pliers to fold over the end of each spoke (about 1/4" is enough). Repeat process on both cans.
Step 8:
Now you are ready to construct your windspinner by joining the spokes together. Overlap the end of a spoke from one can with the end of a spoke from the second can. Slide the corners together and hold firmly with the fingers of one hand, use the long nose pliers to bend the corner over. Use the pliers to crimp the corner tightly together to secure the spokes.
Step 9:
Move onto the next spoke and repeat the above process. Keep linking the spokes together until they are all joined up. Your wind spinner should now look like this…
Step 10:
Using the long nose pliers bend the end of the wire to make a small loop. Thread 2-3 beads onto the wire and then thread the wire through the holes, top and bottom, in the cans. The wire should now run through the centre of your wind spinner. Thread the remaining 2-3 beads onto the wire.
Your wind spinner is now ready to hang either in your garden or on an allotment plot. It is possible to stack 2-3 spinners on top of each other. Just join the wires together or thread a longer piece of wire through the centre. Just remember to thread beads between each spinner or they wont rotate in the wind.
They really come alive when they are spinning in the wind. So I'm going to try and get a video of one of my spinners 'in action' on our allotment plot...
There you go, a great way to upcycle empty drinks cans…enjoy!
Feel free to pin the image below to your Pinterest, but please link back to this post, thank you!
I'm linking up with...
Trash2Treasure over on www.coombemill.com
HomeEtc over on www.thetwinklediaries.co.uk and mummyofboygirltwins.com
Making Home over on www.mrscraftyb.co.uk


8 comments:
Snap on this post, we did just this in half term week with the children staying here on the farm. Although if I'm honest your finished effect may be better than ours. The cans are surprisingly easy to work with and once you get them started kids can help out too. I like how you fix two together, I'd not thought of this, the use of beads to make them spin is good too. I'm glad I'm not the only one to save cans. I'm after a good project for a can with a widget on next. Any ideas?
Thank you for sharing a lovely #upcycle on #CountryKids
What a great idea! Love them #craftingismytherapy
How fab are these? Brilliant fun :-) Sue J #MakingHome
Just wow!! Stunning and very effective - what a great idea!!!! Thanks for sharing. Jess xx #HomeEtc
I absolutely LOVE this idea!!! They are definitely something that I'd make for our allotment — thanks ever s much for sharing!!! Such a fab tutorial! :) Caro x #HomeEtc
What a great idea. Looks great. Would they still spin as well if you spray painted them? #MakingHome
That is such a cool idea! I was wondering, are the cut tin edges sharp? Do you have to be careful not to cut yourself? Love it! :) Lisa
Cucicucicoo...thanks for your question, I thought the same myself before I started making them! Aluminium is surprisingly easy to cut with scissors & a pliable, light metal. I have made 3 windspinners & haven't cut myself once. I would say it's not a craft for young children, but ok for adults and teenagers.
Post a Comment