Thursday, 21 March 2013

Fresh batch

Vintage fabric cushion covers in turquoise and cobalt blue are now back in stock in both my Etsy and Folksy stores. This colour has proved to be a best seller and I've been out of stock for little a while. I'm currently offering free shipping to the United Kingdom for all my vintage fabric cushion covers. Take a look at my full range here.

Thursday, 14 March 2013

Day Trippers

I'm currently working on a feature for UK Handmade, it's due to be published in the Summer Issue, so I'll post a link to it here when the new issue is up and running.

Part of the feature involved a photo shoot in St Werburghs in Bristol. All photos featured here are taken by Jessica, you can see more of her work on Flickr. Her photos will also accompany my feature in the UK Handmade magazine.

St Werburghs is a unique part of Bristol. Just a stones throw from Gloucester Road, which boasts the largest number of independent traders on any one road in the UK.

I love this part of Bristol and there are so many interesting community projects, shops, places to to visit and sights to see...including a pony teathered to a garden gate on a residential street. A few moments later, two girls and their mum casually came out of the house, unteathered the pony and trotted off down the street. Proof that you don't need acres of land and a porsche on the driveway to allow you children to enjoy horse riding.

Once we had finished our photoshoot we popped into The Better Food Company for a cup of tea and a selection of yummy cakes. What better way to round off a day in Bristol?

**Spring Blog Giveaway**
The winner chosen at random for my Spring Giveaway is Jo. She wins over 9 yards of vintage trim and an exclusive 20% discount code to use in my online store. A huge thanks to everyone who took part in the giveaway, it was one of the most popular ones yet...you obviously all love those vintage trims!

Thursday, 7 March 2013

The big fabric sort-out!

I have been an avid collector of vintage fabric for about eight years now. I wouldn't say my collection was out of control, but I have got enough fabric to keep me going for about three or four lifetimes!

For the past three years most of my vintage fabric has been in boxes in the loft. I felt really disconnected from it and since having my daughter my fabric collection has been neglected. When we moved to our new house, I vowed that I would organise it better, I really wanted access to it, so that I could create things with it. It's pointless having loads of yummy fabric if you can't get your hands on it!

My mum was updating her wardrobes and she said I could have her old one. My husband grabbed his drill and some spare pieces of wood and added two shelves to convert the wardrobe into a large cupboard. We then got all the boxes out of the loft and I started the process of sorting through it all. Some I wanted to keep, some to sell and some to pass onto my lovely crafty friends.

As each box came out of the loft, it was such a revelation each time I started sorting through the fabric. There are so many pieces I'd forgotten about. I have amassed some lovely examples of vintage Moygashel, Sanderson, Liberty and Heals fabric. I have one particular piece of vintage Sanderson 'Cobweb' fabric that is just beautiful.

I now have a lovely area in my home where I can house my fabric and look at it whenever I want to. Who knows, maybe I might actually get the time to use it all!

Friday, 1 March 2013

Spring giveaway: vintage trim bundle and 20% discount code

**This giveaway is now closed**

Signs of Spring are starting to emerge in my garden, so I thought I would run a giveaway featuring these lovely vintage floral trims. Plus, you will also win an exclusive discount code for 20% off anything in my Etsy store. I will email the lucky winner their discount code once the giveaway has ended.

Up for grabs is a bundle of vintage trims worth over £10 in total. The prize bundle contains:
3 yards of vintage tiny flower trim in crimson and orange
3 yards of vintage tiny flower trim in lipstick red and navy blue
3 yards of vintage tiny flower trim in royal blue and pale yellow

How to enter:

mandatory - Please visit my Etsy store and leave a comment below telling me which is your favourite item.

three additional ways to enter:
1. Become a follower of my blog. Leave a comment and let me know that you're new.
2. Tweet this giveaway:
@pouchbags Spring blog giveaway: http://pouchbags.blogspot.co.uk/2013/03/spring-giveaway-vintage-trim-bundle-and.html
3. Like my Facebook page http://www.facebook.com/pouchdesigns

**If you enter this giveaway, please state clearly your email address, OR your Facebook/Twitter/Etsy username, so I can contact you in case you win**

The giveaway is open to everyone in the world. The giveaway runs from Friday March 1st through to midnight (GMT) Friday 8th March. This competition is open to worldwide entries. I will pick a winner at random, and announce the winner on Monday 11th March.

Also, I am currently having a big stock clearance sale! Up to 50% off original prices. Check out my sale section for more details.

Thursday, 21 February 2013

Spring 2013 Issue

Brighten up a drab and dreary day, and blow away those cobwebs with the UK Handmade spring issue!

Alongside the regular selection of gorgeous handmade goodies, tutorials, recipes and reviews, UK Handmade brings you exclusive interviews with inspiring designers and makers who use their own unique creativity to provide us with a fresh take on everyday items. So throw off those winter woollies, fling open your windows and breathe in some FRESH air.

You can view it here

UK Handmade is a design led online magazine committed to showcasing and promoting the best creative talent the UK has to offer. You can find out more about the magazine and submitting articles here

Monday, 4 February 2013

Get stitching!

I've felt in a real creative slump recently...moving house hasn't helped, in fact it's stopped me from sewing for many weeks now. I felt like I needed to do something to push myself a bit more and try and learn something a bit different. I've always loved hand sewing and blanket stitch is something I love doing for my owls and rabbits, but I felt it was time to learn a few more stitches. I started having a look around on the internet and got completely sucked into embroidery tutorials, stitching blogs and oh so many video tutorial on youtube. It is seriously addictive and once you start looking at all the embroidery stitches that are our there and all the amazing work people have created, you just want to grab some thread and give it a go!

I was very lucky to receive some beautiful handmade wedding presents. One of which is the owl and the pussycat image at the top of this blog post. Made by the wonderful Sally of Tinkering Times, it hangs on our bedroom wall and I look at it everyday. Recently, I've started to study it in more detail and look closely at the stitches, all the tiny details Sally added to this piece never cease to amaze me.

So, inspired by Sally's work, I ordered an embroidery hoop, got out my embroidery thread, begged a couple of crewel needles from my Mum and started to try out some embroidery of my own. Since looking at a few tutorials I can now recognise some of the different stitches and I have to say that I have fallen slightly in love with split stitch. Having always had an urge to embroider words, split stitch fits the bill nicely. I've always loved blanket stitch, but split stitch is so lovely for creating letters.

I'm pretty please with my first attempt. I think I may have had the thread too thick on the first set of letters I created, or maybe the letters were too small. I tried less thread and bigger letters on the second attempt and can't decide which I prefer. More thread gives a bolder look. I know the embroidery hoop bandwaggon has been trundling along for quite some time, but I can really see the appeal. I've got lots of handmade hoop gifts planned for all my family and friends now I've caught the letter-making bug. Also, once I've practiced a bit more, I'm going to make my daughter some personalised items and if I like them, I may make some more and stock them in my Pouch stores!

Just as a little footnote, I found this video to be very helpful, it's simple and informative and a great place to start if you're new to embroidery.

Saturday, 19 January 2013

Tutorial: foldaway market tote

This handy reusable tote folds away into it's own pocket. Perfect for storing in your purse for spontaneous shopping sprees. I have made mine from upcycled vintage fabric, but feel free to use any lightweight cotton. The following is a sewing tutorial for making this lovely tote. You will find full instructions and free pattern to download and print.
sewing tutorial for vintage fabric foldaway market tote
Foldaway market tote tutorial
You will need:
Fabric
Scissors
Thread
Pins
Pattern paper (squared)
Sewing machine
You will need a piece of material 84 x 71cm. Cut out the 4 main pieces plus a piece for the pocket 18 x 36cm. All seams are 1cm. You can find the pattern template for this tutorial below. It is not to scale and is for guidance only. You will need to make a template on pattern paper, I would recommend using squared paper so that you can achieve true straight edges.
downloadable sewing pattern for tutorial for vintage fabric foldaway market tote
I have also included the full two-page tutorial at the end of this blog post, you are welcome to print that out and work from those instructions.
Step 1. Fold the pocket piece with right sides {RS} together and stitch around the edge leaving a small gap.Trim the corners and turn right side out.
step one sewing tutorial for vintage fabric foldaway market tote
Step 2. Place the pocket with the fold at the top, centrally on the right side of one main bag piece. Stitch around 3 sides.
step two sewing tutorial for vintage fabric foldaway market tote
Step 3. Join the main pieces {RS} to {RS} at the tops of the handles. Neaten the raw edges by pinking or zig-zag machine stitch.
step three sewing tutorial for vintage fabric foldaway market tote
Step 4. Neaten all round the inside raw edge between the handles by pinking or zig-zag machine stitch.Then turn under and sew all around the edge making a curve at the corners.You may need to clip the corners slightly.
step four sewing tutorial for vintage fabric foldaway market tote
Step 5. Sew the bottom of the bag {RS} to {RS} and neaten the raw edges as before.
step five sewing tutorial for vintage fabric foldaway market tote
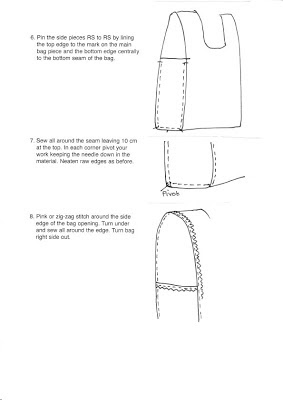
Step 6. Pin the side pieces {RS} to {RS} by lining the top edge to the mark on the main bag piece (about 7 inches from the top) and the bottom edge centrally to the bottom seam of the bag.
step six sewing tutorial for vintage fabric foldaway market tote
Step 7. Sew all around the seam leaving 10mm at the top. In each corner pivot your work keeping the needle down in the material. Neaten raw edges as before.
step seven sewing tutorial for vintage fabric foldaway market tote
Step 8. Pink or zig-zag stitch around the side edge of the bag opening. Turn under and sew all around the edge. Turn bag right side out.
step eight sewing tutorial for vintage fabric foldaway market tote
And there you have it, a strong, yet lightweight foldaway tote, handy for a multitude of uses.
sewing tutorial for vintage fabric foldaway market tote
You are welcome to print the following two instruction pages out and work from there.
I would love to hear any comments or see any photos of your finished foldaway market totes!
Copyright: This tutorial is intended for personal use only. Please don't make these market totes to sell. You are more than welcome to share this tutorial. but if you do, please could you link back to http://www.meyouandmagoo.co.uk
full instructions for sewing tutorial for vintage fabric foldaway market tote

And finally, if you would like to follow me on Instagram, Twitter and Pinterest, you’re more than welcome!

I also sell a range of handmade goodies, including vintage fabric cushion covers, lavender filled rabbits and owls and a gorgeous range of vintage trims browse my shop by clicking this link

LinkWithin

Related Posts with Thumbnails