Thursday, 29 October 2015

Halloween denim clutch purse and reminiscing about Etsy Street Teams

I started selling on Etsy back in early 2007. Soon after, I joined the Etsy UK Street Team. Back in 2007-2008 the Etsy UK Street Team used to set monthly creative challenges. The theme for October 2008 was 'Halloween'. I made this denim clutch purse featuring a ghost on the front and a felt applique "BOO!" on the inside. I recently found this clutch purse in a box on top of my wardrobe and thought I'd share it again in the run up to Halloween.

Halloween denim clutch purse and reminiscing about Etsy Street Teams

Not long after joining Etsy I received a conversation from Seaurchin, another Etsy seller, saying 'why don't you come into the forums and have a chat?'. From there I learnt about the Etsy UK Street Team & I met some amazing crafty people off the back of it. I have fond memories of our forum chats & crafting challenges. it's hard to believe its been nearly nine years since I first set up my Etsy shop.

Halloween denim clutch purse and reminiscing about Etsy Street Teams

Halloween denim clutch purse and reminiscing about Etsy Street Teams

Street Teams are designed to help sellers connect with other members. Sometimes there is a geographical connection, such as the team based in the United Kingdom, sometimes it's a shared skill such as crochet or ceramics.

I still keep in touch with a small group of the original Street Team members. In fact, I recently met up with Lisa from Seaurchin and Laura from Lupin Handmade in Bristol for lunch and a chat. I often see other members of the original Street Team popping up on Twitter & Facebook. I have kept in touch with Sally from Tinkering Textiles, Kirsty from Paperfish, Laura from Laura Fallulah, Lu from Summersville, Megan from Mr.PS and Christine (or Pink Christine as she was known on Etsy), she now blogs about her ex-pat life over on Pinwheels and Stories. We've witnessed many milestones together, such as marriages, arrival of babies, business successes, relationship heartaches & even a move to the United States.

I'm grateful that Etsy bought these people into my life. The UK Street Team also gave birth to the UK Handmade online magazine, which I still write for along with other Etsy Alumnae from the Street Team. Although many of us have moved onto pastures new work wise, we all still have a love of the creative community & still find time for crafting in one form or another.

The Etsy UK Street Team still exists, you can find out more here.

Etsy also recently celebrated 10 Years of Etsy Teams.

Etsy UK Street Team monthly creative challenge for October 2008 Halloween theme


Tuesday, 27 October 2015

Grab a bargain: I'm having a half price sale

I'm having a sale! Save 50% on all my vintage fabric peg bags, lavender sachet owls and rabbits. There are bargains galore in my online shop, head on over to see the full range. This is perfect opportunity to grab some Christmas gifts for your friends and family.
I'm having a sale! Save 50% on all my vintage fabric peg bags, lavender sachet owls and rabbits

Wednesday, 14 October 2015

Vintage Love: mid century enamel Sellotape tin 1950s

This vintage Sellotape tin sat in my Grandmother's cabinet for many years. I love the bright, royal blue colour. The typography and fonts have a real retro feel to them. I'm not sure if it is from the mid-century or a slightly later 1970s-1980s piece. My Grandmother did tend to hold onto things for quite a while, so it may well be from the 1950s.
Vintage Love: mid century enamel Sellotape tin 1950s blue, Borehamwood, enamel, packaging, sellotape, tin, typography, vintage
I seem to remember this vintage tin being in my Grandmother's home for most of my life, so it is at least 40 years old, if not older. As a child, if I was allowed to get the tin of felt tips out of her beautiful antique chiffonier, I would spy this tin. It was still there when I grew up. Everytime she wanted an envelope or her scissors, I would spot the bright blue tin nestled in with all her stationary.
Vintage Love mid century enamel Sellotape tin 1950s
She hated to part with things & we often joked that items in her house had turned vintage just because she'd had them for so long.
When she passed away in December 2014, I was keen to rescue this tin. It now sits on my desk and houses our library cards & various other bits and bobs.
I look at it everytime I sit at my computer & it always reminds me of my Grandmother and how she rarely threw anything away...
Vintage Love: mid century enamel Sellotape tin 1950s blue, Borehamwood, enamel, packaging, sellotape, tin, typography, vintage
If you'd like to see more of my Vintage Finds, head on over to my Pinterest board to see more retro loveliness...
Follow Pouch's board My Vintage Finds on Pinterest.


Thursday, 8 October 2015

October on the allotment: parsnips, beetroot and more weeding

I blogged a few weeks ago about looking forward to eating our first ever homegrown parsnips. I planted some tiny plug plants back in May. We've been watering our parsnips & watching the root vegetables grow bigger. I really wanted to eat them on Christmas Day, but impatient as ever, I pulled one up the other day. Well, it's not going to win any prizes in a beauty contest...but then homegrown veg is about taste over aesthetics. Or that's what I'm telling myself anyway...
allotment, beetroot, fun, growing, harvest, homegrown, organic, parsnips, recipe, soil, vegetable
parsnips, allotment, root vegetable, vegetable, growing
Magoo has worked her socks off helping out with watering over the Summer. Her favourite thing is to harvest the veg she has been lovingly pouring water over. We have had tons of beetroot this year. One of our favourite meals is 'pink mash'. You basically boil the beetroot with the skin on for about 20-25 minutes. You also boil some potatoes. Once the beetroot has cooked & cooled, you can easily pull the skin off. Then you grate the beetroot. Finally mash the beetroot into the potatoes with loads of creme fraiche, butter & seasoning. Magoo loves 'purple mash' with sausages from our local butcher & oodles of gravy.


The Russians call beetroot 'blood builder' and it is packed with amazing nutrients. I find the 'purple mash' recipe is a great way to get Magoo to eat beetroot. I also like to mix raw grated beetroot & carrot with a little oil, seasoning & some sesame seeds to make a simple dish to have with salad. Raw beetroot packs even more of a nutritional punch.
We've had a mild Autumn this year, so we've managed to spend quite a bit of time at the allotment. But it is getting to the time when the crops have been harvested and the beds are getting empty...and that's when the weeds take over! We've got to have a major Autumn tidy-up & then cover the soil for the Winter months. We have toyed with the idea of planting a green manure crop, but we haven't been organised enough this year.
That's the good thing about gardening & allotments - there's always next year to plan for.
This week I'm linking up with:
"How Does Your Garden Grow" over on the beautiful mammasaurus.co.uk

Mammsaurus HDYGG
"Whatever the Weather" over on www.lifeunexpected.co.uk and monkeyandmouse.co.uk
"Let Kids be Kids" over on letkidsbekids.co.uk
Country Kids over on the Coombemill Blog
Image of the Week over on www.trulymadlykids.co.uk


Friday, 2 October 2015

Making a shoebox jetpack: a creative, upcycling idea for kids

Making a shoebox jetpack: a creative, upcycling idea for kids, craft, create
A couple of weeks ago Magoo asked if we could make a jetpack. I've got used to these kinds of requests since becoming a Mum. I knew we had an old shoebox waiting to go out in the recycling & thought the lid would make a good cardboard jetpack.
We grabbed our craft materials and Magoo set to work decorating the lid of the shoebox.
gluing, sticking, cutting, crafting with kids
You can never have too many glittery stars on a rocket backpack can you?
We also covered the top of the shoebox lid with paper to create a surface for Magoo to draw her control buttons onto.
drawing controls onto the shoebox jetpack
I knew we had some yellow and orange netting from a previous crafty project where were had made Easter bonnets back in April. So we reused our upcycled netting from our local Children's Scraptsore to make the jet flames
upcycled neon netting from children's scrapstore weston-super-mare
rocket boosters made with upcycled netting from children's scrapstore
We also used the netting to make arm straps so that Magoo could wear the jetpack on her back.
So after cutting, sticking and gluing an unwanted shoebox lid, the jetpack was finished and ready to play with...
Making a shoebox jetpack: a creative, upcycling idea for kids
Once all the decorating had been completed Magoo was desperate to try it on. She decided that a jetpack would definitely help her to ride faster on her bike...which I think it may well have done :)
handmade rocket booster makes you ride your bike faster
All you need to make this backpack is a shoebox lid (or maybe a cereal box), some thin netting or ribbon, glittery stars or stickers, glue, scissors and lots of imagination...
This week I am linking up with:
Whatever the Weather over on www.lifeunexpected.co.uk and Monkey and Mouse.
Country Kids over on the www.coombemill.com blog.

I'm linking up with #Trash2Treasure also on the www.coombemill.com blog.

Trash 2 Treasure

Friday, 25 September 2015

15 creative ideas for using vintage trims, ribbons, fabric scraps and haberdashery items

I have been selling vintage trim in my online shop for about five years now. I often wonder what creative projects people use the trim for. So I decide to put together a list of inspiration and ideas for utilising trim, ribbon, fabric strips and other haberdashery items. Some designs come directly from customer emails and the appreciation photos they send me. Some are my own sewing projects and the rest I have found via my travels around the web. I also have a vintage trim projects and inspiration board over on Pinterest. There you will find even more ideas to get your creative thoughts flowing…
15 creative ideas for using vintage trims, ribbons, fabric scraps and haberdashery items
1) Bookmark for a journal, diary or sketchbook
I put together this tutorial on my blog a few months ago for a handmade bookmark or strap to use on your journal/notebook. This book strap is pretty to look at, simple to create and useful. The perfect way to personalise your books, journal or a sketchbook. I’ve used a piece of my vintage woven fabric trim in mustard yellow and sage green to make the bookmark in this photo
tutorial for vintage trim or ribbon bookmark
2) Embellish skirts and aprons
You could try adding vintage trim to skirts, tunics, patch pockets and aprons to name but a few. There are lots of examples out there, but I love this beautiful girl’s skirt via Hanna Purzel’s blog. You can also see more of her sewing projects over on Pinterest.
You could try adding vintage trim to skirts, tunics, patch pockets and aprons to name but a few Hanna Purzel
3) Embroidery Hoop Wall Art
I love embroidery hoop art. I know the trend has been running for quite a while now, but it doesn’t seem to be falling out of favour just yet. The great thing there is no limit to what you can add to an embroidery hoop. So grab some ric rac, ribbon, vintage trim, buttons and get to work with various embroidery stitches to create your own piece of unique textile art. This hoop from Little Bit Funkygives you a taste of what can be achieved.
Embroidery Hoop Wall Art Little Bit Funky
I also love the hoop made with vintage fabric from Henhouse Homemade’s blog. Again, a mixture of fabric, vintage linens and trim would make a great patchwork hoop.
embroidery hoop textile art Henhouse Homemade vintage fabric
I’ve also spotted a book entitled “Hoop-La! 100 Things to do with Embroidery Hoops”. It’s high on my wish-list for books I’d like to own. Take a look at the Youtube video advertising the book to get a taste of what’s inside and to inspire you further.
4) Vintage trim belts
Using trim on a handmade belt is a great way to add a retro twist to your outfit. Perfect for adults and children. Take a look at this tutorial from Sew Very for reversible trim fabric belts. This idea is definitely on my to-do list…
sewing tutorial for handmade vintage trim belt from Sew Very
5) Dog collars and leads
In a similar vein to belts, narrower trim can also be used to make DIY Dog collars and leads. Again there are lots of tutorials out there, here are a few of my favorites: Think Crafts, Totally Stitchin and Dog Paw Print.
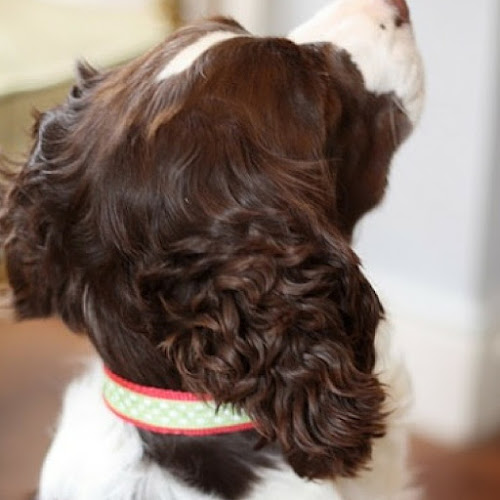
tutorial for DIY handmade dog collar from Think Crafts
6) Upcycled painted key necklaces or decoration.
This is another favourite of mine. Love the idea of combining old keys and vintage trim or ribbons to make an interesting display in your home. I would probably create quite a few to hang from hooks on a piece of driftwood. You could mix any combination of trim and key colours or you could stick to a certain theme to fit in with your home’s colour scheme. Take a look at Maize Hutton’s blog for further ideas.
DIY painted keys from Maize Hutton upcycle jewellery trim ribbon
Alternatively you can wear the keys as an interesting piece of upcycled jewellery. Take a look at Jessica in Your Ear’s blog post for more inspiration. Again the combinations of trim and key colour are endless.
upcycled painted key jewellery from Jessica in Your Ear
7) Adding detail to a bandana
A simple way to add extra detail to a bandana or headscarf is to stitch some vintage trim or ribbon around the seam. I made this bandana for my daughter and added the trim to make a tie. There are lots of bandana tutorials out there, such as this one from Straight Grain and then adapt it with trim or ribbon of your own choice. Great for small children, bandanas tend to stay on a bit better than traditional sun hats. Also perfect for adults to give your outfit a folksy, festival vibe.
adding vintage trim to child's bandana folk festival sewing handmade
8) Crazy Quilts
I don’t really claim to be much of an expert on quilting. But apparently there is such a thing as Crazy Quilts and quite frankly I love them. This is a definition taken from crazy quilts on wikipedia.org:
“Crazy quilts differ from "regular" quilts in other ways as well. Because the careful geometric design of a quilt block is much less important in crazy quilts, the quilters are able to employ much smaller and more irregularly shaped pieces of fabric. In comparison to standard quilts, crazy quilts are far more likely to use exotic pieces of fabric, such as velvet, satin, tulle, or silk, and embellishments such as buttons, lace, ribbons, beads, or embroidery. Crazy quilting as a textile art is extremely creative and free-flowing by nature…”
Debra Dorgan All Things Pretty crazy quilt textile art mixed media art
Some of my favourite examples come from Debra Dorgan, the creative mind behind All Things Pretty. I love the way she combines fabric and trim to create a riot of colour and texture. There are some beautiful examples over on Allie’s In Stitches blog. You can also visit indulgy.com to see a beautiful photo of a selection of stitches used in Crazy Quilting.
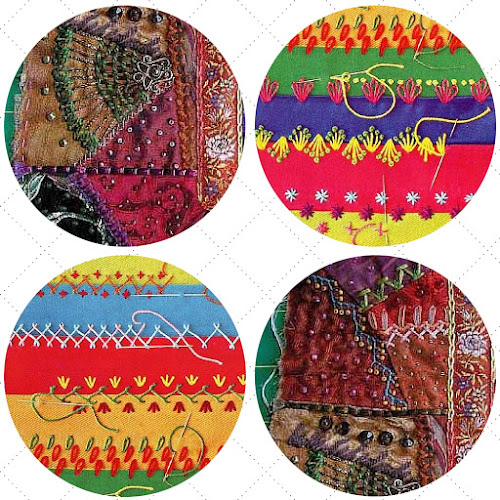
crazy quilt stitches Allie's in Stitches blog trim, ribbon, fabric, textile art
9) Add vintage detail to a cylinder lampshade
I have found through customer emails that one of the most popular uses for vintage trim is to use it to add retro detail to a lampshade. Take a look at this tutorial from Beach Vintage. It shows you a step-by-step guide to recovering a cylinder lampshade with fabric and trim. Just looking at it makes me want to grab a glue-gun and make a heap of lampshades for my home.
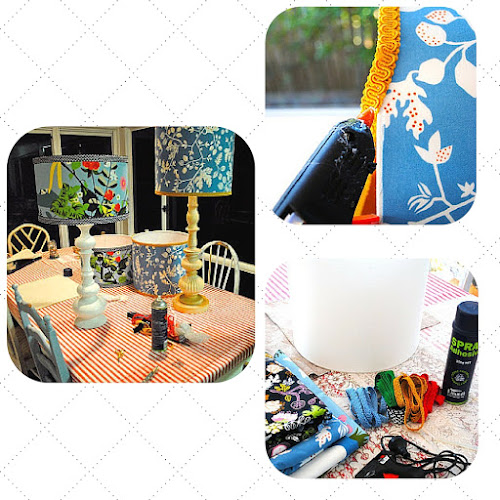
repuposing, recovering, upcycling cylinder lampshade Beach Vintage tutorial blog
10) Create a naked or skeleton lampshade
Another take on the lampshade idea is to create a skeleton or naked shade. Quirky and unique, you can combine just about any fabric or ribbon for this project. The sky is the limit. There are some great examples out there, many use fabric scraps, but you could make one with a combination of fabric and trim.
Pursewna Pursewna creates a different twist on the naked lampshade by tying the fabric across the frame rather than wrapping it. Her original inspiration came from The Pleated Poppy. It’s worth taking a look at both blogs to get more ideas. The naked lampshades featured here are clockwise from top left: Dottie Angel; The Pleated Poppy; lystadsvingen.blogspot.com; Pursewna Pursewna
fabric covered naked or skeleton lampshades, upcycle, fabric, ribbon, trim
11) Ribbon hoop mobile decoration or garland
I’ve seen a few of these over the past few months and I think they would look great with a mixture of ribbon, fabric and vintage trim.
You can either make a mobile version using a hoop to hang from the ceiling. If you take a look at my vintage trim Pinterest board you can see people make many versions of hoops and wall hangings for children’s rooms, parties, weddings and the classroom. I think they are pretty, tactile and colourful. This is another project high on my to-do list. Take a look at this tutorial for a hoop mobile over on Shannon Berry’s blog. There are lots of wedding decoration ideas out there, try Brit + Co and A Low Country Wedding to see some pretty examples using ribbon, trim and fabric strips.
trim or ribbon hoop, garland, tutorial blog, wedding decoration ideas
Another twist on the hoop idea is to create a garland. There is a great tutorial over on The Scrap Shoppe blog using fabric strips. I think it would be interesting to add trim and ribbon into the mix. This is a lovely no-sew project, so could easily get children involved with making one.
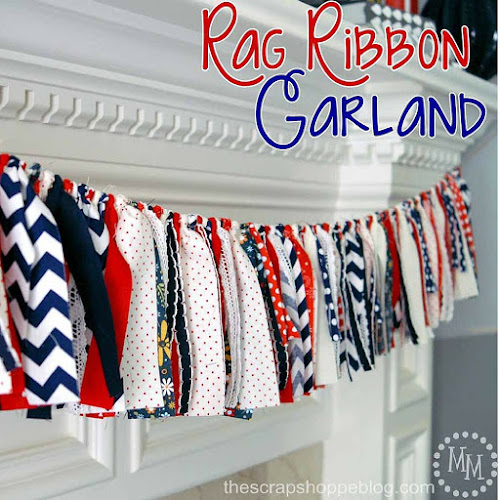
Rag Ribbon Garland from the Scrap Shoppe tutorial blog
12) Fairy Lights
I first saw fairy light like this on a stall at Lou Lou’s Vintage Fair in Bristol a few months ago. I was peering at the lights and realised they were made with covered plastic shot glasses with fairy lights threaded through. There are oodles of tutorials out there. The top two photos in the image below are from Ruususuu and use paper cups. There are more ideas over on itsamakkie.blogspot.co.uk and rebeccasdiy.blogspot.co.uk. You can combine vintage fabric on the shades and then add trim or ricrac along the edges. Again the combinations are endless and they look amazing hanging from a fireplace or bookshelf.
tutorial paper cup fairy lights from Ruususuu and Rebecca's DIY blog
13) Christmas Stockings
A friend of mine gave me a lovely collection of vintage trims a couple of years ago. I had been waiting for inspiration to come to me and I hit on the idea of making felt Christmas stockings with trim detailing. They are simple, but effective and the trim is so festive. I'm really pleased with the way they've turned out.
handmade felt christmas stocking with vintage trim detail from Pouch Vintage
14) Fabric, yarn and ribbon wreaths
Yarn wreaths have become incredibly popular recently. Alongside yarn, wreaths can be made with vintage fabrics, ribbon and trims. Katie Runnels, the creative mind behind The Constant Gatherer makes some of the best examples I’ve seen.
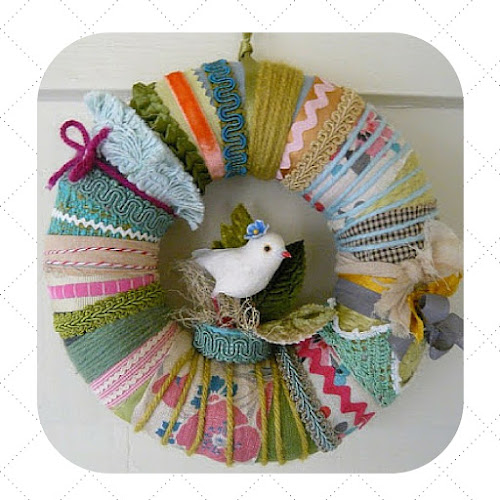
fabric, yarn and ribbon wreaths The Constant Gatherer Katie Runnels handmade
There are heaps of wreath tutorials out there. I’m particularly in love with this vintage fabric sheet version from In Colour Order. It would be nice to add some vintage trim or ribbon into the mix to add extra retro detail.
tutorial for vintage fabric handmade wreath from In Colour Order blog
15) Embellish a bag or purse
I’m a big fan of bags, especially totes. So a tote combined with vintage trim ticks lots of boxes for me. It’s no wonder I fell in love with this bag featured on the Lola Nova blog. Grab the Carryall Bag pattern from Fabenmix and add your own modification and embellishments.
15 creative ideas for using trims, ribbons, fabric scraps and haberdashery items, embellish a bag or purse Lola Nova and Fabenmix
Another lovely example is this purse from Karen Meyers made from a repurposed wool jumper with vintage trim detailing. It is featured on the Grains of Earth blog post – 18 ways to upcycle old sweaters.
15 creative ideas for using trims, ribbons, fabric scraps and haberdashery items, embellish a bag or purse Karen Meyers Grains of Earth blog
Follow Pouch's board vintage trim projects & inspiration on Pinterest.
I hope you have enjoyed my list of creative ideas and uses for using trims, ribbons, fabric scraps and haberdashery gubbins. Please head on over to my Pinterest board for further inspiration. The projects included in this blog post are for personal crafting use. Please do not employ for commercial use unless the specific tutorial gives permission for this. I have made a great deal of effort to credit all the designs featured here. If you share this post, please take the time to credit their hard work. Thank you & happy crafting!
I'm linking up with The List over on youbabymemummy.com

You Baby Me Mummy


Tuesday, 22 September 2015

Autumn Issue of the UK Handmade Magazine is out now

The Autumn Issue of the UK Handmade Magazine is out now.

It features my interview with EJ the creative mind behind Hatchet + Bear.

Hatchet + Bear create a beautiful selection of handcrafted wooden utensils and objects for the home. Run by EJ, a woodworker with a background in arboriculture, she is perfectly placed to understand the visceral pleasure of crafting with wood. EJ’s work blends traditional methods, simple hand tools and locally foraged timbers to create pieces that have a timeless quality. Alongside her range of products, EJ runs regular spoon making workshops, many of which combine camping, cooking and carving. We caught up with EJ to find out more about her influences and what the future holds for her business.

I found EJ to be an incredibly interesting interviewee. I particularly like the way she felt compelled to follow her creativity which she had neglected for many years. She explains how unfulfilling her work was and the decision she made to turn her life around:

“I was not listening to or taking my creativity very seriously at all. Eventually, I came to my senses - I felt unsatisfied. Actually, I felt ill. Over time, I had amassed a jumble of design ideas and design opinions in my head, that I thought were amazing and yet I wasn't doing anything about them. I have always loved trees and being in the woods, so I went on to study Arboriculture with the Royal Forestry Society. I then went on to do an Art and Design Foundation at Trowbridge College - which was brilliant. I was on a roll so I studied further, in Product and Furniture Design at Kingston University, which taught me alot - including what kind of designer I did not want to be. I left university and tried my hand at a few traditional and heritage crafts. Green Woodworking was the one that really got me. I merged everything together, and here I am”.

Alongside Hatchet + Bear, the magazine also features Amanda J Simmons, Serena Smith, Dazzle @ Dovecot, Handmade at Kew and much, much more...

Head on over to our website to read the magazine online.

LinkWithin

Related Posts with Thumbnails